
Dental X-Ray Positioning Guide
Effective dental imaging relies on precise techniques, ensuring diagnostic quality while minimizing patient exposure; proper positioning is paramount for accurate assessments.
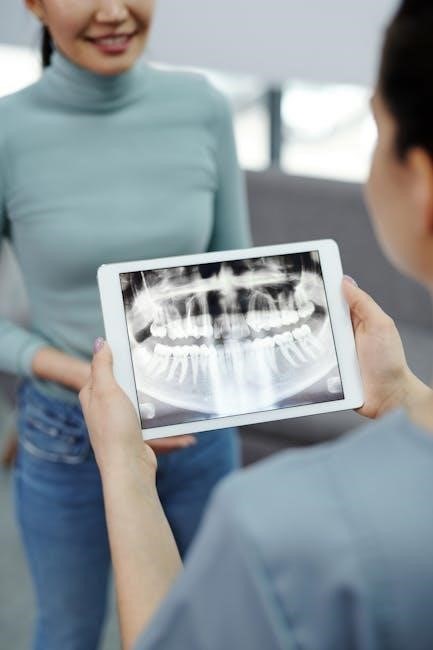
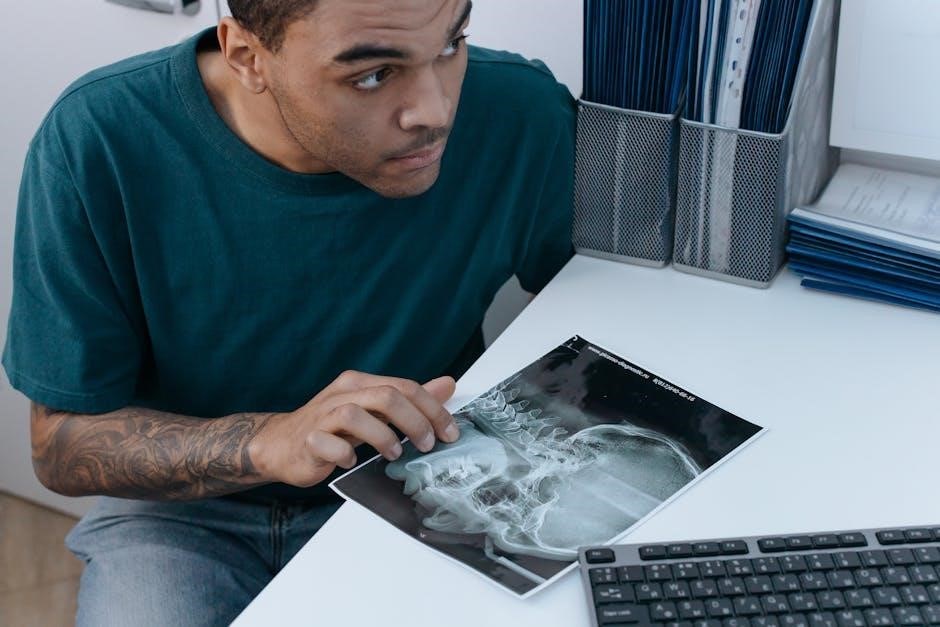
Dental radiography is a crucial diagnostic tool, utilizing x-rays to visualize structures not visible during a clinical exam. This allows for early detection of caries, periodontal disease, and other oral pathologies. Understanding the principles of image formation, including radiation physics and the interaction of x-rays with tissues, is fundamental.
Proper patient positioning, alongside correct film or sensor selection and exposure settings, directly impacts image quality. Rectangular collimation, a key safety and quality control measure, minimizes patient exposure and improves image contrast. A position-indicating device ensures a minimum focus-to-skin distance of 20cm.
Successful radiographic interpretation depends on obtaining diagnostically acceptable images, achieved through meticulous technique and attention to detail. Further training, particularly hands-on laboratory experience, significantly enhances proficiency in this essential skill.
Importance of Proper Positioning
Accurate patient positioning is absolutely critical in dental radiography, directly influencing diagnostic accuracy and minimizing retakes. Positioning the patient so the area being imaged is closest to the x-ray beam optimizes image clarity and reduces geometric distortion. Incorrect positioning leads to errors like cone cuts, foreshortening, or elongation, hindering accurate interpretation.
Maintaining a consistent and reproducible technique is essential. This includes ensuring the tongue is pressed against the palate, teeth are properly seated within the bite-block groove, and the indicator light is centered and perpendicular to the floor. These steps ensure the film/sensor is parallel to the tooth surface.
Ultimately, precise positioning reduces patient radiation exposure by minimizing the need for repeated exposures due to poor image quality, contributing to a safer and more efficient radiographic procedure.
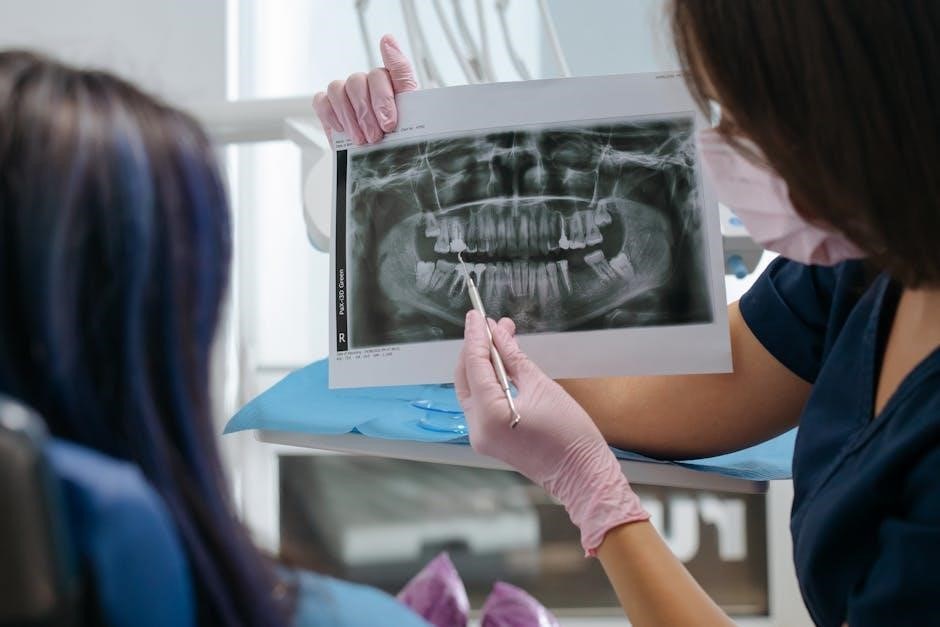
Bitewing Radiography
Bitewing radiographs primarily visualize the crowns of the posterior teeth, detecting interproximal caries and assessing alveolar crest bone levels effectively.
Bitewing: Patient Positioning
Optimal patient positioning is crucial for successful bitewing radiography. The patient should be seated upright, with the head stabilized to minimize movement during exposure. Position the patient so that the area of the mouth being imaged is closest to the radiographic beam, ensuring accurate representation.
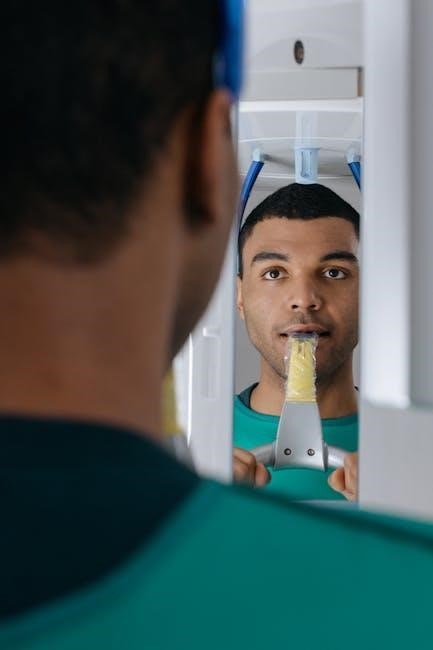
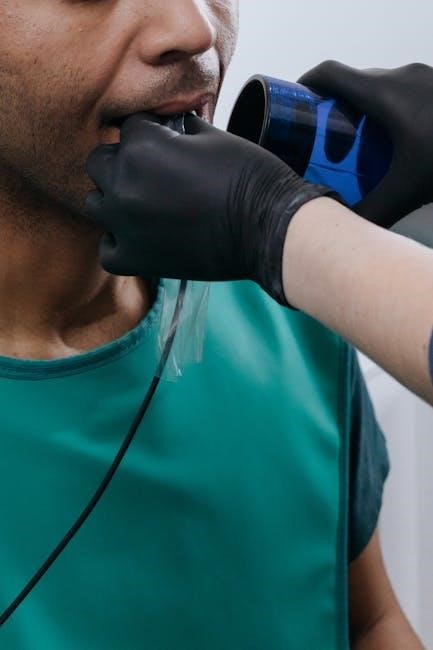
Instruct the patient to open their mouth slightly and to keep their tongue positioned away from the teeth being radiographed – ideally pressed against the palate. This creates space for proper film or sensor placement. A bite-block is essential; it elevates the film/sensor and provides a stable base.
Ensure the indicator light for the midsagittal plane is centered and perpendicular to the floor. This aids in achieving accurate vertical and horizontal angulation. Proper positioning minimizes distortion and ensures a diagnostic image. The patient’s chin should be neither too high nor too low, maintaining a relaxed and natural posture.
Bitewing: Film/Sensor Placement
Accurate film or sensor placement is fundamental to bitewing radiography. Place the film in the mouth so that the entire tooth – crown and entire root surface – is covered by the radiograph. The convex side of the film, typically colored (purple or green), should face the palate.
Utilize a bite-block to maintain consistent vertical positioning and provide a stable base for the film/sensor. Ensure the film/sensor is positioned coronally to the mucogingival junction, capturing the entire clinical crown.
Carefully adapt the film/sensor to the palate’s curvature, ensuring complete contact with the teeth. Proper adaptation minimizes cone-cuts and ensures a clear, diagnostic image. Rectangular collimation is strongly recommended to reduce patient exposure and improve image quality. Confirm the film/sensor is securely held in place by the patient’s bite.
Bitewing: Vertical and Horizontal Angulation
Achieving correct angulation is crucial for optimal bitewing images. The indicator light for the midsagittal plane should be centered and perpendicular to the floor during exposure. Position the patient so the area being imaged is closest to the radiographic beam.
Vertical angulation dictates whether the entire tooth is captured. Too much vertical angulation results in a foreshortened image, while too little leads to elongation. Horizontal angulation ensures the teeth are superimposed without excessive overlap or separation.
Maintain a consistent horizontal angulation, typically with the beam directed slightly toward the palate. Precise angulation minimizes distortion and provides a clear view of the interproximal spaces, vital for detecting caries. Careful attention to these angles ensures diagnostic accuracy.
Bitewing: Common Errors & Artifacts
Several errors can compromise bitewing radiographs. Cone-cuts, caused by insufficient collimation, create dark, clipped edges. White spots can result from air bubbles or incomplete sensor/film coverage. Overexposure leads to a dense, washed-out image, while underexposure produces a radiolucent image lacking detail.
Patient movement during exposure causes blurring, rendering the image unusable. Improper vertical angulation results in elongation or foreshortening of teeth. Artifacts, like metallic restorations or foreign objects, can obscure diagnostic areas.
Rectangular collimation minimizes scatter radiation and improves image quality. Utilizing a position indicating device ensures a minimum focus-to-skin distance of 20cm. Careful technique and quality control are essential to avoid these common pitfalls and obtain diagnostic images.
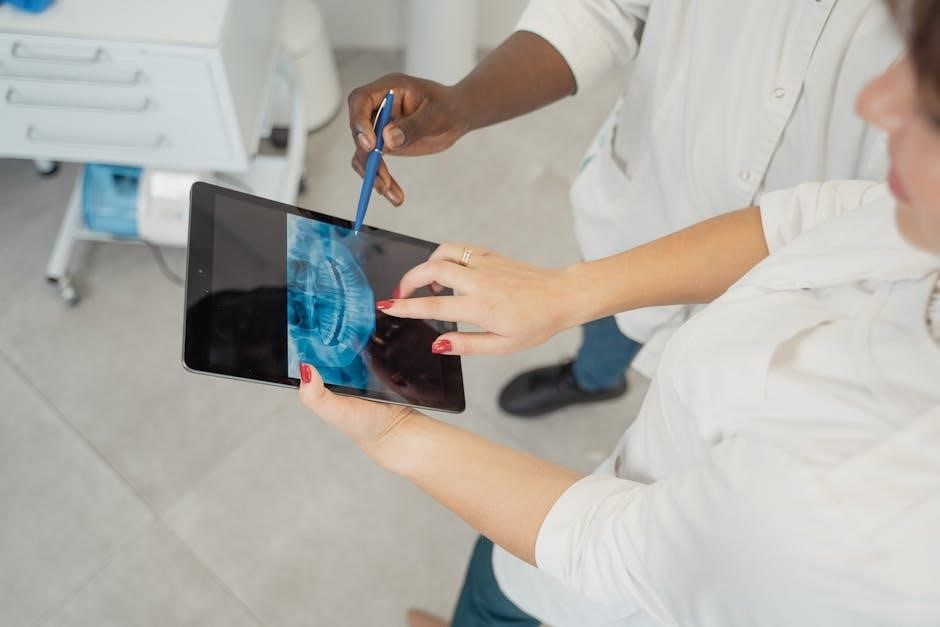
Periapical Radiography
Periapical imaging visualizes the entire tooth, from crown to apex, revealing surrounding bone structures; precise film/sensor placement is crucial for diagnostic accuracy.
Periapical: Patient Positioning
Optimal patient positioning is foundational for successful periapical radiographs. The patient should be seated upright with the head stabilized, ensuring the area being imaged is closest to the x-ray beam’s path. Instruct the patient to keep their mouth still and breathe through their nose during exposure.
The midsagittal plane, an imaginary vertical line dividing the face equally, must be perpendicular to the floor. A correct position ensures symmetrical imaging of both sides of the mouth. Position the patient so the area of interest is closest to the radiographic beam.
The tongue should be elevated and pressed firmly against the palate, effectively withdrawing it from the imaging area. This maximizes space and minimizes superimposition of anatomical structures. The patient’s chin should be slightly elevated, and the teeth should be in occlusion, ideally using a bite-block to maintain consistent vertical positioning.
Periapical: Film/Sensor Selection & Placement
Selecting the appropriate size film or sensor is crucial for capturing the entire tooth, from crown to apex, and surrounding structures. Typically, size 2 periapical films are used for anterior teeth, while size 3 films accommodate larger posterior teeth. Digital sensors offer instant image review and reduced radiation.
When placing the film or sensor, ensure the convex surface faces the palate or tongue, depending on the tooth being imaged. Place the film so the entire tooth (crown and entire root surface) is covered by the radiograph. The film should be positioned parallel to the long axis of the tooth to avoid distortion.
Carefully instruct the patient to close gently onto the film or sensor, avoiding biting down excessively, which can cause distortion. The indicator light for the midsagittal plane should be centered and perpendicular to the floor. Proper placement minimizes retakes and optimizes diagnostic quality.
Periapical: Paralleling Technique
The paralleling technique aims to position the film or sensor parallel to the long axis of the tooth, and the x-ray beam perpendicular to the film. This minimizes geometric distortion, providing an accurate representation of tooth and bone structures. Utilize a paralleling instrument – a device holding the film in place – to achieve this precise alignment.
Position the patient so the area being imaged is closest to the radiographic beam. Ensure the patient’s tongue is pressed against the palate, and teeth are within the groove of the bite-block. A position indicating device, ensuring a minimum focus-to-skin distance of 20 cm, should be attached to the tube head.
Rectangular collimation is strongly recommended in dental radiology, reducing patient exposure and improving image quality. Careful attention to these details yields diagnostic images with minimal distortion, crucial for accurate diagnosis and treatment planning.
Periapical: Bisecting Angle Technique
The bisecting angle technique involves angling both the film/sensor and the x-ray beam. The film is positioned approximately one-third of the way between the tooth apex and the palate, bisecting the angle formed by the tooth and the film. This technique is often used when paralleling is difficult due to anatomical limitations.
Precise angulation is critical; incorrect angles lead to significant distortion. While easier to implement in some cases, it inherently introduces more geometric distortion than the paralleling method. Careful technique and understanding of distortion principles are essential.
Positioning requires the patient to maintain a stable head position, with the tongue pressed against the palate. Ensure the entire tooth, from crown to apex, is covered by the radiograph. Further training through hands-on labs significantly improves proficiency in this technique.
Periapical: Angulation & Distortion Control
Maintaining correct angulation is vital in periapical radiography to avoid image distortion. Both cone-cut (short root appearance) and elongation (stretched image) are common errors stemming from improper vertical angulation. Horizontal angulation causes overlapping of adjacent teeth, obscuring diagnostic information.
Geometric distortion is inherent in radiography, but minimized through precise technique. The bisecting angle technique, while sometimes necessary, introduces more distortion than paralleling. Careful patient positioning – tongue to palate, indicator light centered – is crucial;
Rectangular collimation significantly reduces scatter radiation and improves image quality, minimizing distortion. A position indicating device ensures a minimum focus-to-skin distance of 20cm, enhancing safety and image clarity. Consistent practice and attention to detail are key to mastering angulation and distortion control.
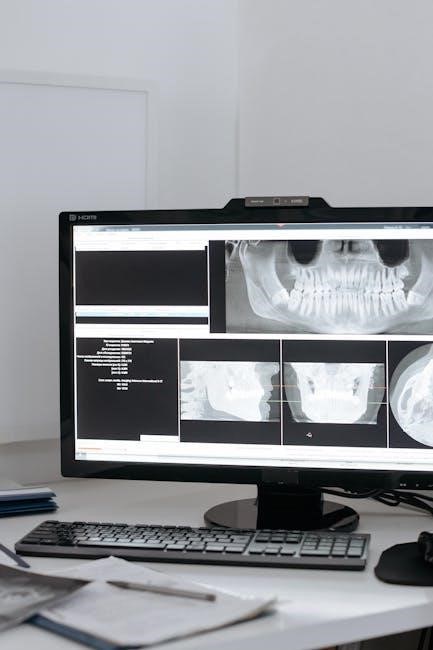
Panoramic Radiography
Panoramic imaging demands precise patient positioning and head support for optimal results; chin and lip placement are critical for minimizing artifacts and distortion.
Panoramic: Patient Positioning & Head Support
Achieving a successful panoramic radiograph begins with meticulous patient positioning. The patient should stand comfortably, ensuring the area being imaged is closest to the radiographic beam. Proper head support is crucial; patients need clear instructions to maintain a stable position throughout the exposure.
The Frankfort horizontal plane – an imaginary line extending from the ear canal to the corner of the mouth – must be parallel to the floor. This ensures accurate image orientation. Utilize the machine’s built-in features, like temple and chin supports, to stabilize the head.
Instruct the patient to bite gently together with their lips relaxed and not strained. Avoid any jewelry or metallic objects that could interfere with the image. A position indicating device ensures a minimum focus-to-skin distance of 20 cm, enhancing safety. Rectangular collimation further minimizes unnecessary radiation exposure.
Panoramic: Chin and Lip Positioning
Precise chin and lip positioning are vital for a clear panoramic image. The patient should be instructed to gently elevate their chin forward, avoiding excessive upward or downward movement. This forward positioning helps to establish the correct image layer and minimizes distortion of the mandible.
Lips should remain relaxed and naturally closed, but not tightly compressed. Encourage patients to breathe through their nose during the exposure to prevent lip movement. Avoid any tension in the facial muscles, as this can lead to artifacts and image degradation.
The machine’s chin support plays a critical role in maintaining consistent positioning. Ensure the chin rests comfortably and securely within the support. Proper lip positioning, combined with stable head support, contributes significantly to diagnostic image quality and reduces the need for retakes.
Panoramic: Common Artifacts & Troubleshooting
Several artifacts can appear on panoramic images, impacting diagnostic quality. Metallic objects – jewelry, piercings, or dental restorations – create radiopaque shadows. Patient movement during exposure causes blurring, rendering the image unusable.
Ghost images arise from scatter radiation, often due to incorrect exposure settings or insufficient collimation. Lip or cheek interference appears as radiolucent areas obscuring the dental structures.
Troubleshooting involves verifying patient positioning, ensuring proper collimation (rectangular is preferred), and confirming correct exposure factors. Removing metallic objects before exposure is crucial. If movement artifacts occur, reposition the patient and retake the image. Careful attention to these details minimizes artifacts and maximizes diagnostic yield.
Pediatric Dental Radiography
Adapting techniques for children requires sensitivity and patience; minimizing radiation dose is essential, utilizing collimation and appropriate exposure settings for young patients.
Pediatric: Adapting Techniques for Children
Successfully obtaining radiographs in pediatric patients demands a modified approach, prioritizing comfort and cooperation; Communication is key; explain procedures simply, using age-appropriate language and positive reinforcement. Parental presence can be reassuring, but avoid having them stand within the direct radiation field.
Positioning may require assistance or creative adaptations. Smaller film sizes or digital sensors are often preferable. Utilize pediatric bite-blocks and positioning aids to achieve proper angulation and minimize exposure time.

Consider the child’s developmental stage and emotional maturity. Shorter exposure times and gentle immobilization techniques are crucial. The tongue should be positioned correctly, often requiring guidance. Always prioritize a relaxed atmosphere to reduce anxiety and movement during image capture. Proper patient positioning, with the area being imaged closest to the beam, is vital.
Pediatric: Minimizing Radiation Dose
Protecting children from unnecessary radiation exposure is a fundamental principle in dental radiography. Employing the ALARA (As Low As Reasonably Achievable) principle is paramount. Utilize rectangular collimation to restrict the x-ray beam to the area of interest, significantly reducing scatter radiation.
Employ high-speed film or digital sensors, as they require less radiation to produce a diagnostic image. Proper exposure settings, based on the patient’s size and the technique being used, are essential. A position-indicating device ensures a minimum focus-to-skin distance of 20cm.
Lead apron and thyroid collar usage is mandatory, shielding sensitive organs. Careful technique and accurate positioning minimize retakes, further reducing cumulative dose. Regular quality control checks of equipment ensure optimal performance and minimize unnecessary exposure. Prioritize clinical judgment; radiographs should only be taken when the benefits outweigh the risks.
Quality Control & Safety
Consistent quality control, including collimation and position-indicating devices, is vital for safe and effective radiography, ensuring optimal image quality and patient protection.
Collimation & Position Indicating Devices
Rectangular collimation is strongly recommended in dental radiology, significantly reducing patient exposure by limiting the size of the x-ray beam to the area of interest. This focused approach minimizes scatter radiation and enhances image clarity. A position-indicating device, an essential component of dental x-ray equipment, ensures a minimum focus-to-skin distance of 20 cm is maintained.
This critical safety measure further reduces radiation dose to the patient. These devices are typically attached to the tube head and automatically restrict the beam size and distance. Proper utilization of both collimation and position-indicating devices demonstrates a commitment to the ALARA principle – As Low As Reasonably Achievable – in radiation safety. Regular checks and maintenance of these devices are crucial for their continued effectiveness and adherence to safety standards.
Radiation Protection Protocols
Comprehensive radiation protection protocols are fundamental in dental radiography, safeguarding both patients and operators. These protocols encompass several key elements, including the use of lead aprons and thyroid collars for patients, effectively shielding vulnerable organs from scatter radiation. Operators must utilize appropriate personal protective equipment, such as lead gloves and eyewear.
Strict adherence to exposure time and kVp settings, guided by established dental radiography guidelines, is vital for minimizing radiation dose. Regular monitoring of radiation levels using dosimeters ensures compliance and identifies potential hazards. Proper training and continuing education for dental personnel are essential for maintaining competency in radiation safety practices. Implementing these protocols demonstrates a dedication to responsible and ethical dental care.
Leave a Reply