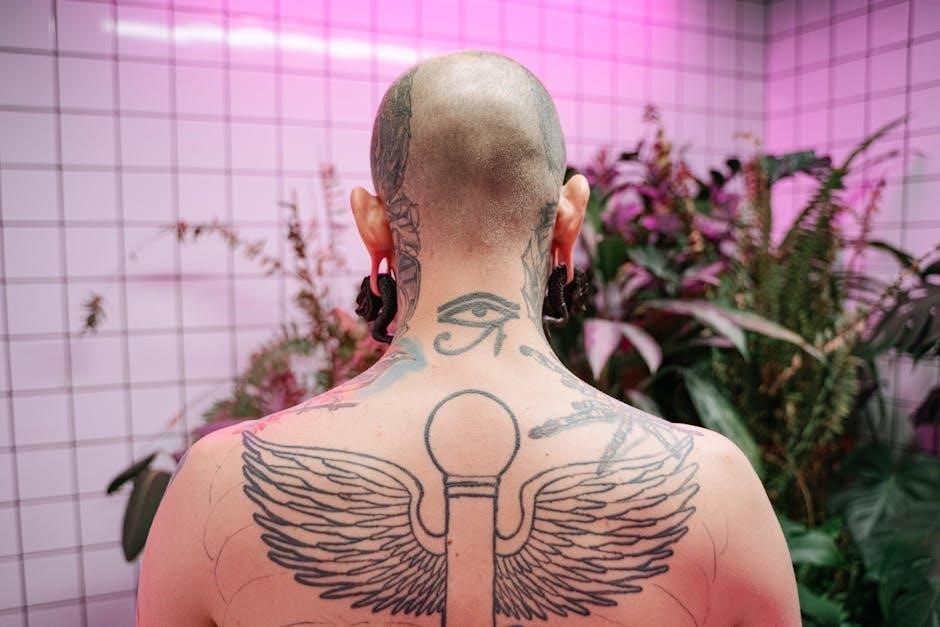
Ear stretching is a fascinating body modification practice, involving gradually increasing the size of ear piercings․ This comprehensive ear stretching size guide will demystify the process․
Understanding the various measurements – millimeters, inches, and gauge – is crucial for safe progression․ We’ll provide a detailed gauge chart for reference․
What is Ear Stretching?
Ear stretching, a form of body modification, is the practice of expanding ear piercings to accommodate larger gauge jewelry․ It’s a gradual process, typically starting with a standard piercing and progressively increasing the size over time․ This isn’t a quick transformation; patience and consistent, careful stretching are paramount for healthy earlobes․
The process involves gently coaxing the earlobe to expand, utilizing various stretching methods and appropriate jewelry materials․ Understanding the different ear stretching sizes – measured in millimeters (mm), inches (“), and gauge (G) – is fundamental․ These measurements often overlap, creating potential confusion, which a comprehensive ear gauge size chart can resolve․
Successfully stretching requires diligent aftercare, including regular cleaning and lubrication․ Ignoring proper techniques can lead to irritation, infection, or even tearing․ This guide aims to provide the knowledge needed to navigate the journey safely and effectively, ensuring beautiful, healthy stretched lobes․
Historical and Cultural Significance
The practice of ear stretching boasts a rich and diverse history, deeply rooted in various cultures worldwide․ Evidence suggests its origins trace back thousands of years, with early examples found in ancient civilizations like the Mayans and Aztecs, where it symbolized status and spiritual connection․ Across different societies, stretched ears have represented beauty, courage, and tribal affiliation․
In some African tribes, larger earlobes signified wisdom and social standing․ Indigenous groups in South America utilized ear stretching as part of ceremonial practices․ Even today, the practice continues in numerous communities, maintaining its cultural relevance․ Understanding this historical context provides a deeper appreciation for the art of ear stretching beyond a modern aesthetic choice․
While contemporary ear stretching often focuses on personal expression, acknowledging its ancestral roots adds layers of meaning․ Choosing appropriate ear stretching sizes and techniques honors the tradition’s legacy․
Safety Considerations Before You Start
Prioritizing safety is paramount before embarking on ear stretching․ Begin with healthy, fully healed piercings – attempting to stretch unhealed tissue significantly increases the risk of complications․ Thoroughly research the process and understand the commitment involved; stretching is a gradual journey, not a quick transformation․
Assess your skin’s elasticity and overall health․ Individuals with certain skin conditions or compromised immune systems should consult a medical professional before starting․ Hygiene is crucial; always wash your hands and jewelry meticulously to prevent infection․ Choose high-quality, biocompatible jewelry materials like glass, titanium, or surgical steel․
Avoid stretching during periods of stress or illness, as these can hinder healing․ Be realistic about your pain tolerance and listen to your body․ Understanding ear stretching sizes and progressing slowly are key to minimizing trauma and ensuring a safe, comfortable experience․

Understanding Ear Stretching Measurements
Ear stretching utilizes three measurement systems: millimeters (mm), inches (“), and gauge (G)․ Navigating these can be confusing, but understanding each is vital for proper sizing․
Millimeters (mm) Explained
Millimeters (mm) represent a straightforward, metric measurement of the diameter of the ear stretching jewelry․ This system is often favored for its clarity and consistency, making it easier to visualize the actual size of the stretch․ Unlike gauge, which can have slight variations, a 3․2mm plug will always be 3․2mm in diameter․
When looking at an ear gauge size chart, the millimeter measurement provides a precise understanding of how much space your jewelry occupies within the piercing․ It’s particularly useful when comparing sizes across different jewelry materials or vendors, ensuring a consistent fit․ Many experienced stretchers prefer using millimeters for accurate planning of their stretching progression․
Understanding millimeters is essential because it’s the foundation for converting to other measurement systems․ It allows for a clear, objective assessment of your ear’s current size and helps you determine the appropriate next step in your stretching journey․ Accurate millimeter measurements minimize the risk of attempting a stretch that’s too large, potentially causing damage․
Inches (“) Explained
Inches (“), while less common than millimeters or gauge in the ear stretching community, represent another unit for measuring jewelry diameter․ This system, rooted in the imperial measurement system, expresses the size of the jewelry as a fraction of an inch․ For example, you might encounter sizes like 1/8 inch or 5/16 inch when browsing certain jewelry options․
Although less frequently used in detailed ear gauge size charts, understanding inches can be helpful when encountering jewelry descriptions from specific vendors or older resources․ Converting from inches to millimeters or gauge is straightforward, allowing for easy comparison across different measurement systems․
It’s important to note that inch measurements can sometimes be less precise than millimeters, potentially leading to slight discrepancies․ However, when used in conjunction with other measurements, inches can provide a valuable point of reference; Familiarity with this system ensures a comprehensive understanding of available sizing options․
Gauge (G) Explained
Gauge (G) is the most traditional unit of measurement used in ear stretching, and you’ll encounter it frequently when discussing or purchasing stretching jewelry․ Counterintuitively, a higher gauge number indicates a smaller size․ This stems from wire manufacturing, where gauge originally referred to the diameter of wire – higher numbers meant thinner wire․
Therefore, starting with a larger gauge number (like 20G) and working down to smaller numbers (like 0G, 00G) signifies increasing the size of your stretch․ A comprehensive ear gauge size chart will clearly illustrate this descending scale․ It’s crucial to remember this inverse relationship to avoid confusion when selecting jewelry․
While seemingly illogical, the gauge system is deeply ingrained in the body modification community․ Understanding it is essential for communicating effectively with piercers and fellow enthusiasts, and for accurately interpreting jewelry specifications․
Gauge vs․ Millimeter vs․ Inch: Why the Confusion?
The primary source of confusion in ear stretching stems from the existence of three different measurement systems: gauge (G), millimeters (mm), and inches (“)․ Each system offers a different way to express the diameter of the stretch, and conversions aren’t always perfectly precise․
Historically, gauge was the standard, but millimeters offer a more intuitive, linear progression․ Inches are less common but sometimes appear in jewelry descriptions․ The issue arises because a single gauge size can have slightly varying millimeter and inch equivalents depending on the manufacturer․
A reliable ear gauge size chart displaying all three measurements is vital․ Always prioritize millimeter measurements for accuracy when planning your stretch․ Relying solely on gauge can lead to inconsistencies and potentially unsafe stretching practices․ Understanding these nuances ensures a smoother, safer journey․

Complete Ear Gauge Size Chart
Our detailed chart provides a comprehensive overview of ear stretching sizes, converting between gauge (G), millimeters (mm), and inches․ It’s your essential reference!
0G — 00G Size Range
Transitioning into the 0G to 00G range signifies a substantial increase in ear lobe size, demanding patience and meticulous care․ 0G typically measures around 6․35mm (1/4 inch), while 00G equates to 8․13mm (5/16 inch)․ This stage often involves moving from tapers to O-rings or single-flare plugs to maintain the stretch․
It’s vital to avoid rushing this process; a gradual increase is paramount to prevent tearing or blowouts․ Listen to your body and only upsize when your ear feels fully healed and comfortable at the current gauge․ High-quality materials like glass, stone, or titanium are recommended to minimize irritation․ Remember, consistent aftercare – cleaning and lubrication – is non-negotiable during this phase․
Consider the weight of the jewelry as larger gauges can become heavy, potentially causing discomfort or stretching beyond your desired size․ Regularly check for signs of irritation, such as redness, swelling, or discharge, and consult a professional piercer if any concerns arise․ This range requires dedication and responsible stretching practices․
1G ⎻ 2G Size Range
Entering the 1G to 2G range represents a significant commitment to ear stretching, requiring diligent aftercare and patience․ 1G typically measures around 8․13mm (5/16 inch), while 2G is 9․53mm (3/8 inch)․ At this point, the ear lobe has undergone considerable modification, and maintaining the stretch becomes increasingly important;
Consistent down-sizing is often recommended to promote healthy tissue growth and prevent the stretch from becoming overly reliant on jewelry․ High-quality materials like glass, stone, or titanium are crucial to minimize irritation and allergic reactions․ Pay close attention to any signs of discomfort or inflammation․
Weight becomes a more prominent factor with larger gauges; choose jewelry that is comfortable and doesn’t pull excessively on the lobe․ Regular cleaning with a saline solution and gentle massage can help maintain elasticity and prevent blowouts․ Consulting a professional piercer for guidance is highly advisable during this stage․
4G — 6G Size Range
The 4G to 6G range (approximately 5․16mm ⎻ 8․13mm or 3/16″ — 5/16″) marks a noticeable transition in ear stretching, demanding increased attention to ear health․ Stretching within this range requires a slower pace, typically increasing by no more than one size at a time, and allowing ample time for the tissue to adjust․
Blowouts become a greater concern at these larger gauges, emphasizing the importance of proper jewelry material and consistent aftercare․ Glass, titanium, or high-quality stone are preferred choices, minimizing irritation and promoting healing․ Regular cleaning with saline solution is essential․
Downsizing is still beneficial, helping to maintain elasticity and prevent the stretch from becoming overly stressed․ Monitor for any signs of migration or tearing, and consult a professional piercer if issues arise․ Patience and consistent care are key to successfully navigating this stage․
8G — 10G Size Range
Entering the 8G to 10G range (roughly 3․23mm ⎻ 2․65mm or 5/32″ ⎻ 9/32″) signifies a substantial commitment to ear stretching․ This stage requires diligent attention to detail and a heightened awareness of your ear’s response to the increasing size․ Stretching should be exceptionally gradual, potentially taking months between size increases․
Blowouts are increasingly likely if stretching is rushed or if unsuitable jewelry is used․ Opt for high-quality materials like glass, titanium, or stone to minimize irritation and promote healthy tissue expansion․ Consistent, gentle massage with oil can aid in elasticity․
Regular downsizing is crucial to maintain ear health and prevent permanent damage․ Pay close attention to any signs of irritation, pain, or migration, and seek professional advice if needed․ Patience and consistent aftercare are paramount during this phase․
12G — 14G Size Range
The 12G to 14G range (approximately 2․0mm, 1․6mm or 3/16″ — 5/32″) represents a significant step towards larger gauges, yet still allows for relatively easy downsizing if desired․ This phase demands continued patience and a commitment to proper stretching techniques․ Rushing the process can lead to micro-tears and potential blowouts․
Jewelry selection is critical; prioritize biocompatible materials like glass, titanium, or high-quality stone․ Avoid materials that may cause allergic reactions or irritation․ Consistent lubrication with a stretching balm or oil is essential to maintain tissue health and elasticity․
Monitor your ears closely for any signs of distress, such as redness, swelling, or pain․ Downsizing periodically can help maintain blood flow and prevent permanent damage․ Remember, slow and steady wins the race!

Safe Ear Stretching Techniques

Gradual stretching is paramount for healthy earlobes․ Choosing biocompatible jewelry minimizes irritation, while proper insertion and removal prevents damage during the process․
The Importance of Gradual Stretching
Gradual stretching is absolutely fundamental to a positive ear stretching experience․ Rushing the process is the most common cause of blowouts, tears, and permanent damage to your earlobes․ Think of it as a marathon, not a sprint – patience is key!
Increasing your gauge too quickly doesn’t allow the skin time to adapt and expand naturally․ This can lead to micro-tears that cause irritation, pain, and ultimately, a compromised earlobe․ A general rule of thumb is to wait at least several weeks, and often months, between stretches, depending on your individual healing rate․
Listen to your body! If you experience any pain, redness, excessive swelling, or discharge, stop stretching immediately and downsize to a smaller gauge until your ears have fully healed․ Prioritizing slow, consistent progress will ensure a healthier, more aesthetically pleasing result in the long run․ Remember, healthy lobes are beautiful lobes!
Choosing the Right Jewelry Material

Selecting appropriate jewelry materials is paramount for successful and healthy ear stretching․ Certain materials are far more biocompatible than others, minimizing the risk of allergic reactions and irritation․ Avoid materials like nickel, as it’s a common allergen and can significantly impede healing․
High-quality materials like surgical steel (316L or 316LVM), titanium (ASTM F-136), glass, stone, and even certain types of wood are excellent choices․ Titanium is often considered the gold standard due to its exceptional biocompatibility and resistance to corrosion․
Consider the weight of the jewelry, especially during initial stretches․ Lighter materials like glass can be more comfortable for newly stretched lobes․ Always ensure your jewelry is polished and free of sharp edges to prevent friction and trauma to the skin․ Prioritize quality over cost – your ear health is worth the investment!
Proper Insertion and Removal Techniques
Gentle handling is key when inserting and removing stretching jewelry․ Always wash your hands thoroughly before touching your ears or jewelry to prevent introducing bacteria․ Lubricate the jewelry and your lobe with a water-based lubricant or saline solution to ease insertion․
Avoid forcing the jewelry; if it doesn’t slide in smoothly, stop and re-lubricate․ A twisting motion can help, but excessive force can cause tearing․ For removal, gently twist and pull – never yank․ Inspect the jewelry for any damage before re-insertion․
Regularly check your lobes for irritation or damage during this process․ If you encounter resistance, downsize to a smaller gauge until your ear heals․ Remember, patience is crucial; rushing can lead to blowouts and setbacks․ Proper technique minimizes trauma and promotes healthy stretching․

Ear Stretching Aftercare
Consistent aftercare is vital for healthy ear stretching․ Regular cleaning, recognizing infection signs, and proper lubrication are essential for optimal healing and preventing complications․
Cleaning Your Stretched Ears
Maintaining cleanliness is paramount throughout the ear stretching journey, regardless of your current gauge size․ A regular cleaning routine minimizes the risk of infection and promotes healthy tissue growth․ Twice daily cleaning is generally recommended, using a sterile saline solution – you can purchase this pre-made, or create your own by dissolving ¼ teaspoon of non-iodized sea salt in 1 cup of warm distilled water․
Gently saturate a clean cotton swab or pad with the saline solution and carefully clean the front and back of your earlobes, paying close attention to the stretching area․ Avoid using harsh soaps, alcohol-based cleaners, or hydrogen peroxide, as these can irritate the skin and impede healing․ After cleaning, gently dry the area with a clean, disposable paper towel․
Remember to always wash your hands thoroughly before handling your jewelry or touching your ears․ Consistent, gentle cleaning is a cornerstone of successful and safe ear stretching, ensuring a comfortable and aesthetically pleasing result․
Recognizing and Addressing Signs of Infection
Early detection is crucial when it comes to potential infections during ear stretching, no matter your gauge․ Be vigilant for signs like excessive redness, swelling, persistent pain, unusual discharge (especially if it’s yellow or green), or a noticeable increase in warmth around the piercing site․ A slight crusting is normal, but thick, pus-like discharge is a red flag․
If you suspect an infection, immediately stop stretching and remove the jewelry․ Gently clean the area with sterile saline solution as described previously․ Do not re-insert jewelry until the infection has completely cleared․ While minor irritation can sometimes be managed with increased cleaning, a full-blown infection requires professional medical attention․
Consult a doctor or a reputable piercer – they can assess the severity and recommend appropriate treatment, which may include antibiotics․ Ignoring an infection can lead to serious complications, so prompt action is essential for maintaining your ear health․
Lubrication and Massage
Regular lubrication and massage are vital components of healthy ear stretching, promoting elasticity and minimizing trauma as you increase your gauge size․ Use a high-quality, hypoallergenic oil – options include jojoba oil, vitamin E oil, or specifically formulated stretching balms․ Avoid petroleum-based products, as they can trap bacteria․
Gently massage your lobes for several minutes each day, focusing on both the front and back of the ear․ This helps to break up scar tissue, improve blood circulation, and encourage the skin to expand smoothly․ When inserting or removing jewelry, always use lubrication to reduce friction and prevent tearing․

Massage should be gentle; avoid forceful manipulation․ Pay attention to your body and stop if you experience any pain; Consistent lubrication and massage contribute significantly to a comfortable and successful stretching journey, regardless of your current ear gauge․

Common Mistakes to Avoid
Avoid rushing the stretching process, using unsuitable jewelry materials, or ignoring irritation signs․ Patience and proper care are key to healthy, beautiful stretched ears!
Stretching Too Quickly
One of the most prevalent errors in ear stretching is attempting to increase the gauge size too rapidly․ This impatience can inflict significant trauma on the earlobe tissue, leading to blowouts, rips, and prolonged healing times․ The ear needs adequate time to adjust to each incremental size increase․
A general guideline suggests waiting at least several weeks, and often months, between stretches, depending on individual healing rates․ Listen to your body; if you experience persistent pain, redness, or warmth, it’s a clear indication to pause and allow your ears to recover․
Gradual progression is paramount․ Jumping to larger sizes prematurely compromises the integrity of the earlobe, potentially resulting in permanent scarring or the need to downsize and restart the stretching process․ Remember, slow and steady truly wins the race when it comes to safe ear stretching․
Using Unsuitable Jewelry
Selecting the correct jewelry material is absolutely critical for successful and healthy ear stretching․ Avoid materials known to cause irritation or allergic reactions, such as nickel․ Opt instead for high-quality materials like surgical steel, titanium, glass, stone, or even certain types of wood․
Poorly finished jewelry – those with rough edges or imperfections – can cause micro-tears in the earlobe, hindering the stretching process and increasing the risk of infection․ Ensure jewelry is polished and smooth to facilitate comfortable insertion and removal․
Furthermore, the shape and design of the jewelry matter․ Tapered plugs are often used for initial stretching, but prolonged use can cause concentrated pressure․ Consider using straight plugs or circulars once the ear is sufficiently stretched to distribute the weight more evenly and promote healthy tissue growth․
Ignoring Signs of Irritation
Early detection is key when it comes to ear stretching․ Ignoring even minor signs of irritation can quickly escalate into serious problems, potentially requiring professional medical attention․ Redness, swelling, pain, or unusual warmth around the piercing are all red flags that shouldn’t be dismissed․
Discharge, particularly if it’s colored (yellow or green) or has an unpleasant odor, is a clear indication of a possible infection․ Itching beyond the normal adjustment period is also concerning․ Continuing to stretch despite these symptoms will only exacerbate the issue․
Downsizing your jewelry or even temporarily removing it can allow the earlobe to heal․ Consistent monitoring and prompt action are vital․ Don’t push through the pain; listen to your body and prioritize its health over achieving a specific gauge size․
Resources and Further Information
Explore our downloadable ear gauge size chart (PDF) for quick reference! Find answers to frequently asked questions and consider consulting a professional piercer for guidance․
Downloadable Ear Gauge Size Chart (PDF)
For your convenience, we’ve created a comprehensive, downloadable ear gauge size chart in PDF format․ This handy resource consolidates all the essential information presented in this guide, offering a readily accessible reference point throughout your ear stretching journey․
The PDF chart clearly displays the conversions between gauge (G), millimeters (mm), and inches (“), allowing for easy cross-referencing when planning your next stretch․ It’s designed to be printed or viewed digitally on any device, ensuring you always have the correct sizing information at your fingertips․
Beyond the basic conversions, the chart also includes helpful notes on typical stretching timelines and jewelry material recommendations․ Downloading this chart empowers you to confidently navigate the ear stretching process, minimizing potential errors and maximizing safety․ Click the link below to download your free copy and embark on a well-informed stretching experience!
Frequently Asked Questions (FAQs)
Is stretching my ears painful? Mild discomfort is common, but significant pain indicates you’re stretching too quickly․ Gradual progression is key! What’s the difference between 0G and 00G? 0G is larger; 00G is approximately 6mm, while 0G is 8mm․ Can I skip sizes? Absolutely not! Skipping can cause tearing and blowouts․
How long should I wait between stretches? Typically, wait 2-3 months between each size increase, allowing your lobes to fully heal․ What jewelry materials are best? Surgical steel, glass, and stone are excellent choices due to their biocompatibility․ Avoid nickel! What if I get a blowout? Downsize your jewelry and consult a piercer․
Can I reverse the stretching process? Lobes can shrink somewhat, but may not return to their original size․ Is it safe to use tapers for stretching? Tapers can be used cautiously, but avoid leaving them in for extended periods․ Where can I find a reliable piercer? Seek recommendations and verify certifications․
Consulting a Professional Piercer
Seeking guidance from a qualified piercer is paramount for a safe and successful ear stretching journey․ A professional can assess your ear anatomy, recommend an appropriate stretching schedule, and provide personalized advice․ They can also perform initial stretches accurately, minimizing the risk of complications․
Don’t hesitate to ask questions! A reputable piercer will happily explain the process, address your concerns, and offer aftercare instructions․ They can identify potential issues early on, such as improper healing or signs of infection․ Furthermore, a piercer can assist with down-sizing jewelry if needed, or help manage blowouts․
Verify their credentials and ensure they adhere to strict hygiene standards․ Look for certifications and positive reviews․ Remember, a professional piercer isn’t just a service provider; they’re a valuable resource throughout your ear stretching experience, ensuring optimal health and aesthetic results․
Leave a Reply